
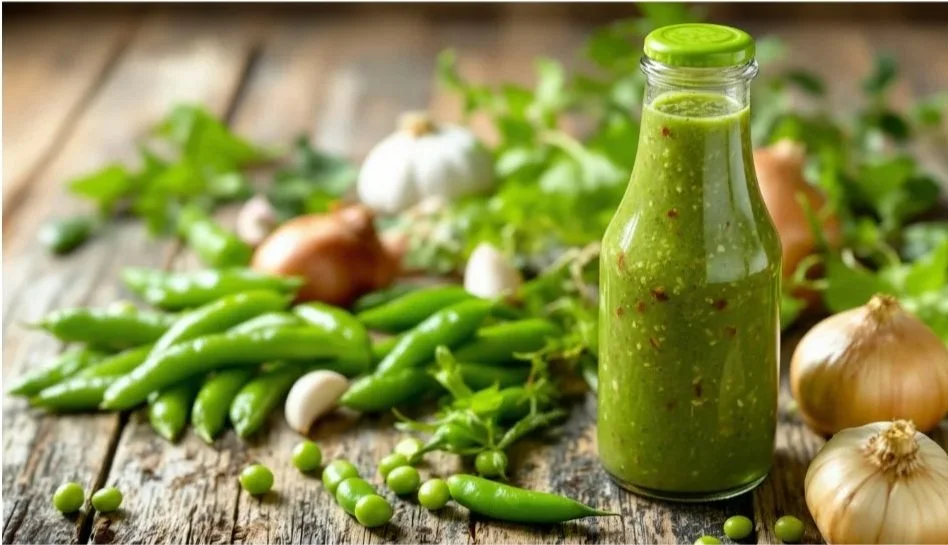
Fermented Green Heat: A Unique Hot Sauce with Peas, Green Chillies, Garlic & Onions
If you love the funky complexity of fermented foods and the bright kick of a homemade hot sauce, you’re going to love this recipe. Today, we’re taking a slightly unconventional path by using green peas as the creamy, subtly sweet backbone of a vibrant fermented green chilli hot sauce. Paired with garlic, onions, and fresh chillies, this sauce brings together heat, sweetness, and tang in a beautifully balanced way.
Whether you’re new to fermentation or already obsessed (like me), this is an approachable and deeply rewarding project that delivers bold flavor—and keeps getting better with time.
Why Ferment Hot Sauce?
Fermentation does more than just preserve your ingredients. It transforms them.
Flavor depth: Fermentation softens harsh edges and creates natural umami.
Probiotic goodness: A living sauce supporting gut health.
Customizable heat & acidity: You choose how spicy, funky, or tangy your final sauce becomes.
Long shelf life: When stored properly, fermented hot sauces can last months.
Peas might seem unusual, but they add body and subtle sweetness—balancing the punch of the green chillies.
Ingredients
For a 500–750 ml batch:
1 cup fresh or frozen peas
10–12 green chillies (adjust for heat preference)
5–6 cloves garlic
1 medium onion, roughly chopped
2 cups non-chlorinated water
1.5 tbsp sea salt (for ~3% brine)
Optional flavor boosters:
A squeeze of lime juice
A handful of fresh coriander
1 tsp sugar or honey (for roundness, post-fermentation
1. Prepare the brine
Dissolve the sea salt in the water. Taste—it should be pleasantly salty, like the sea.
2. Prep your vegetables
Remove stems from the chillies. Roughly chop chillies, onion, and garlic. If using frozen peas, no need to thaw.
3. Pack the jar
In a sterilized wide-mouth jar, add peas, chillies, garlic, and onion.
Pour the brine over until everything is submerged.
Important: Keep all vegetables below the brine to avoid mold.
Use a fermentation weight, a smaller jar, or even a clean stone.
4. Ferment
Cover with a fermentation lid or a loose jar lid (to allow gas release).
Leave at room temperature (18–22°C) for 5–10 days.
Bubbles = good.
Cloudy brine = normal.
White harmless yeast (kahm yeast) = fine, skim it.
Fuzzy mold = not fine → discard.
Taste after day 5. Once the flavor is tangy with a bit of funk, it’s ready.
5. Blend into Hot Sauce
Strain the mixture (but save the brine!).
Blend all the solids until smooth, adding brine bit by bit until you reach your desired consistency.
For extra brightness, blend in:
a splash of vinegar or lime juice
a small handful of fresh herbs
Taste and adjust: more acidity, a touch of salt, or a whisper of sweetness.
6. Bottle & Store
Transfer the sauce to a clean bottle or jar.
Because it’s fermented and alive, keep it in the fridge.
The flavor will continue evolving for weeks—often getting smoother and more rounded.
How to Use This Green Fermented Hot Sauce
This sauce is incredibly versatile:
Drizzle over grilled chicken or fish
Add a spoonful to ramen or noodle bowls
Splash onto tacos or quesadillas
Mix with mayo or yogurt for a creamy spicy dip
Stir into dressings for a tangy heat hit
Spread on sandwiches or smash burgers for a herbal zing
The peas give it a velvety texture, while the fermented chillies and garlic deliver bright, earthy heat. It’s addictive.
Final Thoughts
Fermenting hot sauce may sound intimidating, but it’s truly a low-effort, high-reward kitchen project. With simple ingredients and a bit of time, you’ll create a sauce richer and more complex than anything in a store.
If you try this recipe, I’d love to help you customize it—want it smokier? Sweeter? Spicier? Just ask!
Brown Irish Soda Bread with Egg and Honey
This version of Irish soda bread combines the hearty flavor of wholemeal flour with the richness of an egg and the natural sweetness of honey. Perfect for breakfast, tea time, or alongside your favorite meal. Let's get started!

Ingredients:
250g of wholemeal flour
250g of plain flour
1 teaspoon of baking soda
1 teaspoon of salt
1 egg
400ml of buttermilk
2 tablespoons of honey
Instructions:
Step 1: Preheat and Prepare
Preheat your oven: Set your oven to 200°C (392°F) and prepare a baking sheet by lining it with parchment paper or lightly flouring it.
Step 2: Mixing the Dry Ingredients
Combine flours, baking soda, and salt: In a large bowl, whisk together the wholemeal flour, plain flour, baking soda, and salt until they are evenly distributed.
Step 3: Adding the Wet Ingredients
Beat the egg and mix with buttermilk: In a separate bowl, lightly beat the egg and then mix it with the buttermilk and honey.
Make a well in the center: Create a small well in the middle of the dry ingredients.
Pour in the buttermilk mixture: Gradually add the buttermilk mixture into the well, mixing it into the dry ingredients with your hand or a wooden spoon. Mix until a dough forms, but be careful not to overwork it.
Step 4: Shaping the Dough
Turn out the dough: Transfer the dough onto a lightly floured surface and gently knead it just enough to bring it together.
Shape into a round loaf: Form the dough into a round shape, flattening it slightly.
Score the top: Using a sharp knife, make a deep cross on the top of the loaf. This traditional step allows the bread to bake evenly.
Step 5: Baking the Bread
Transfer to baking sheet: Place the shaped dough onto your prepared baking sheet.
Bake: Bake in the preheated oven for about 30-35 minutes or until the bread is golden brown and sounds hollow when tapped on the bottom.
Step 6: Cooling
Cool on a wire rack: Once baked, remove the bread from the oven and let it cool on a wire rack. This allows the bread to set and develop its flavor.
Tips and Tricks:
Using Wholemeal Flour: This recipe uses a mix of wholemeal and plain flour for a balanced texture. You can adjust the ratio according to your preference.
Adding Seeds or Dried Fruit: Enhance the flavor and texture by mixing in seeds, nuts, or dried fruit like raisins or currants.
Serving Suggestions: Serve your soda bread warm with a spread of butter, jam, or honey. It’s also excellent for making toast or sandwiches.
Enjoy your homemade brown Irish soda bread with egg and honey. The richness and sweetness will make it a favorite in no time.
Happy baking! 🍞
Got questions or need more tips? Feel free to ask!

Homemade Protein Balls: A Convenient and Nutritious Snack
Protein balls are an excellent snack option for a quick energy boost, pre-workout fuel, or a tasty treat that’s packed with nutrients. Making your own protein balls at home is easy, fun, and allows you to customize the ingredients to your liking. Ready to roll up your sleeves and make some delicious protein balls? Let’s get started!
Why Make Your Own Protein Balls?

Customizable: Choose your favorite flavors, ingredients, and nutritional add-ins.
Healthy: Control the quality and quantity of ingredients, avoiding unnecessary additives.
Convenient: Perfect for meal prep and can be stored for on-the-go snacking.
What You’ll Need
Ingredients:
1 cup (240 ml) of oats (rolled or quick oats)
1/2 cup (120 ml) of protein powder (your choice of flavor)
1/2 cup (120 ml) of nut butter (peanut, almond, or cashew)
1/4 cup (60 ml) of honey or maple syrup
1/4 cup (60 ml) of chia seeds or flaxseeds
1/4 cup (60 ml) of mini chocolate chips or dried fruit (optional)
1 teaspoon of vanilla extract
Equipment:
Mixing bowl
Spatula or wooden spoon
Baking sheet or plate
Parchment paper
Refrigerator
Step-by-Step Instructions
Step 1: Prepare Your Ingredients
Measure and gather ingredients: Ensure you have all your ingredients ready to go.
Step 2: Combine Dry Ingredients
Mix dry ingredients: In a mixing bowl, combine the oats, protein powder, and chia seeds (or flaxseeds). Mix until well combined.
Step 3: Add Wet Ingredients
Add nut butter and honey: Add the nut butter and honey (or maple syrup) to the dry mixture.
Mix well: Use a spatula or wooden spoon to thoroughly combine the ingredients.
Step 4: Add Vanilla Extract and Optional Mix-Ins
Add vanilla extract: Stir in the vanilla extract.
Fold in mix-ins: If using, fold in mini chocolate chips or dried fruit.
Step 5: Form the Protein Balls
Roll into balls: Use your hands to roll the mixture into small, bite-sized balls (about 1 inch in diameter).
Place on a lined sheet: Place the protein balls on a baking sheet or plate lined with parchment paper.
Step 6: Chill and Set
Refrigerate: Place the baking sheet or plate in the refrigerator and let the protein balls chill for at least 30 minutes to firm up.
Step 7: Store and Enjoy
Store in an airtight container: Keep the protein balls in the refrigerator for up to a week or in the freezer for longer storage.
Enjoy your homemade protein balls: Grab a protein ball whenever you need a quick and nutritious snack!
Tips and Variations
Experiment with Flavors: Try different nut butters, protein powder flavors, and mix-ins to create unique combinations.
Adjust Sweetness: If you prefer less sweetness, reduce the amount of honey or maple syrup.
Boost Nutrition: Add superfoods like hemp seeds, goji berries, or cacao nibs for extra nutrition.
Homemade protein balls are a convenient and healthy snack that you can easily tailor to your taste. Whether you enjoy them as a pre-workout boost, a post-workout recovery, or a nutritious on-the-go snack, these protein balls are sure to satisfy.
Happy snacking! 🍫
Got questions or need more tips? Feel free to ask!

Classic French Baguette Recipe
Creating a traditional French baguette at home is a rewarding experience. With a few simple ingredients and some patience, you can enjoy the crisp crust and soft, airy interior of this iconic bread. Here's a step-by-step recipe to guide you through the process.

Ingredients
500 grams bread flour
325 milliliters water (room temperature)
10 grams salt
5 grams instant yeast
Instructions
Prepare the Dough:
In a large mixing bowl, combine the bread flour and instant yeast.
Gradually add the water while mixing until a rough dough forms.
Add the salt and continue to mix until the dough is smooth and elastic. This can be done by hand or with a stand mixer fitted with a dough hook.
First Rise:
Cover the bowl with a damp cloth or plastic wrap and let the dough rise at room temperature for about 1 to 1.5 hours, or until it has doubled in size.
Shape the Baguettes:
Gently deflate the dough and divide it into three equal portions.
Shape each portion into a rough rectangle, then fold the long edges towards the center and roll into a log shape.
Place the shaped dough on a lightly floured surface, seam side down, and cover with a damp cloth. Let them rest for 15 minutes.
Final Shaping:
Roll each log into a long, thin baguette shape, about 30-35 centimeters in length.
Place the shaped baguettes on a baking sheet lined with parchment paper or a baguette pan. Cover with a damp cloth and let them rise for another 45 minutes to 1 hour.
Preheat the Oven:
Preheat your oven to 250°C (482°F). Place a baking stone or an inverted baking sheet in the oven to heat up. Place a shallow pan of water on the bottom rack to create steam.
Score and Bake:
Just before baking, use a sharp knife or a lame to make several diagonal slashes on the top of each baguette.
Carefully transfer the baguettes onto the preheated baking stone or sheet.
Bake for 20-25 minutes, or until the baguettes are golden brown and sound hollow when tapped on the bottom.
Cool and Enjoy:
Transfer the baked baguettes to a wire rack to cool completely before slicing.
Tips for Perfect Baguettes
Hydration: The dough should be slightly sticky. Adjust the water amount if necessary.
Steam: Creating steam in the oven helps achieve a crisp crust. You can also spray water inside the oven just before baking.
Patience: Allowing the dough to rise properly is key to developing flavor and texture.
Enjoy your homemade French baguettes with butter, cheese, or your favorite spread. Bon appétit! 🥖
Feel free to share your baking experience or any variations you've tried!

Fermented Árbol & Ancho Coffee Hot Sauce
This hot sauce balances smoky depth, bright acidity, and layered bitterness from coffee introduced three different ways. Fermenting the chilies builds natural complexity, while charred aromatics and a touch of sugar round it all out.
Ingredients
Dried chilies
15 dried árbol chilies
3 dried ancho chilies
3 medium onion, halved
6 cloves garlic, unpeeled
2 Tbsp raw sugar (or panela)
2 Tbsp sea salt, non-iodized
1 ½ cups coffee-infused hot water (for soaking chilies) – see step below
Acid & coffee layers
½ cup coffee-infused kombucha vinegar
1 fresh double espresso shot (about 60 ml)
Instructions
Step 1: Infuse Coffee into Your Bases
1. Soaking liquid: Brew 1 ½ cups of hot water, stir in 2 Tbsp ground coffee, steep 4 minutes, then strain. This is your chili-rehydration liquid.
2. Kombucha vinegar: Infuse ½ cup vinegar with 1 Tbsp coarsely ground coffee. Let sit 24–48 hours, then strain.
3. Espresso: Brew fresh, but keep it aside until bottling.
Step 2: Char the Aromatics
Heat a dry cast-iron pan until smoking.
Place the onion halves and garlic cloves, cut-side down, until deeply charred. Peel garlic after cooling. This adds smoky sweetness to the final sauce
Step 3: Rehydrate the Chilies
Remove stems and most seeds from chilies.
Soak them in the hot coffee-infused water for 20–30 minutes until soft. Reserve the soaking liquid.
Step 4: Blend the Fermentation Mash
In a blender, combine:
Rehydrated chilies
Reserved coffee-water (add enough to get a thick paste)
Charred onion and garlic
Sugar and salt
Blend into a coarse paste.
Step 5: Fermentation
Pack the mash into a clean glass jar. Press down to remove air pockets.
Add a fermentation weight or a small zip-top bag filled with brine (2% salt water).
Loosely close with a fermentation lid or cloth.
Ferment at room temperature (18–22°C / 65–72°F) for 7–14 days, tasting regularly. The mash should turn tangy, slightly effervescent, and pleasantly funky.
Step 6: Final Sauce Assembly
1. Transfer the fermented mash to a blender.
2. Add:
Coffee-infused kombucha vinegar
Fresh double espresso
Extra reserved chili-soaking liquid, as needed for consistency
3. Blend until smooth. Adjust salt and acidity to taste.
Step 7: Bottle & Rest
Pour into sterilized bottles.
Let it rest in the fridge at least 3–5 days before using to allow flavors to meld.
Flavor Notes
Árbol chilies bring sharp heat and brightness.
Ancho chilies add raisin-like sweetness and earthy body.
Charred onion & garlic soften the chili heat with caramelized depth.
Coffee (3 ways):
In the soak → subtle roasted bitterness.
In the vinegar → tangy, malty undertone.
As espresso → bold, aromatic punch that lingers at the finish.
This sauce pairs beautifully with grilled meats, roasted vegetables, or even drizzled over eggs and tacos.

Homemade Granola: A Crunchy, Nutty, Naturally Sweet Delight

There’s something deeply satisfying about making your own granola. The aroma that fills your kitchen as oats toast and honey caramelizes is enough to make anyone a morning person. Whether you sprinkle it on yogurt, enjoy it with milk, or snack on it by the handful, homemade granola offers a hearty, customizable, and wholesome option you’ll keep coming back to.
Today, I’m sharing my go-to granola recipe—nutty, lightly sweetened, and perfectly crunchy. The best part? You can tweak it to match your taste or use whatever you already have in your pantry.
Easy Homemade Granola Recipe
Prep Time: 10 minutes
Cook Time: 25–30 minutes
Yield: About 5 cups
Ingredients:
3 cups old-fashioned rolled oats
1 cup nuts (almonds, walnuts, pecans – roughly chopped)
½ cup seeds (pumpkin, sunflower, or a mix)
½ cup shredded coconut (optional)
½ teaspoon cinnamon
¼ teaspoon salt
⅓ cup honey or maple syrup
¼ cup coconut oil or olive oil
1 teaspoon vanilla extract
½ to 1 cup dried fruit (raisins, cranberries, chopped dates – added after baking)
Instructions:
Preheat oven to 325°F (160°C). Line a baking sheet with parchment paper.
Mix dry ingredients: In a large bowl, combine oats, nuts, seeds, coconut, cinnamon, and salt.
Warm the wet ingredients: In a small saucepan over low heat, combine honey (or maple syrup) and coconut oil. Stir until melted and smooth. Remove from heat and stir in vanilla extract.
Combine and coat: Pour the wet mixture over the dry ingredients. Mix well to coat everything evenly.
Spread and bake: Spread the granola mixture evenly on the prepared baking sheet. Bake for 25–30 minutes, stirring once halfway through. Keep an eye on it toward the end—golden brown is good; too dark is bitter.
Cool and add fruit: Once the granola is golden and fragrant, remove it from the oven and let it cool completely. Stir in dried fruit.
Store: Keep in an airtight container at room temperature for up to two weeks—or freeze for longer shelf life.
Tips & Customizations:
More crunch? Add a whipped egg white to the wet ingredients for extra clusters.
Lower sugar? Reduce sweetener to ¼ cup or swap in mashed banana or applesauce.
Flavor twist? Add a teaspoon of orange zest, a sprinkle of nutmeg, or a tablespoon of cocoa powder.
Final Thoughts
Homemade granola is one of those small rituals that make a big difference in your daily routine. It’s budget-friendly, adaptable, and a perfect gift in a mason jar. Once you try it, you might never go back to store-bought again.
Let me know in the comments how you make yours unique—or tag me in your creations on social media. Happy baking!
Creamy Butternut Orzo with Crispy Chorizo and Peas
When comfort food meets bold flavor, this Creamy Butternut Orzo with Crispy Chorizo and Peas rises to the top. It’s the kind of dish that hugs you from the inside out—rich and velvety from the butternut squash, dotted with bursts of sweetness from the peas, and crowned with golden, crispy chorizo for an irresistible savory crunch.
If you're looking for a one-pan dinner that feels indulgent yet nourishing, this is it.
Why You’ll Love This Recipe
Ultra Creamy: Thanks to blended roasted butternut squash and a splash of cream.
One-Pan Wonder: Minimal cleanup, maximum flavor.
Balanced Flavors: Sweet squash, smoky chorizo, and bright peas all in harmony.
Weeknight Friendly: Ready in about 30 minutes.
Ingredients
Here’s what you’ll need to create this cozy dish:
1 tbsp olive oil
1 small onion, finely diced
2 cloves garlic, minced
200g (7 oz) chorizo, half sliced for topping, half diced for the base
250g (9 oz) orzo pasta
400g (14 oz) butternut squash, peeled and cubed
750ml (3 cups) chicken or vegetable stock
100ml (⅓ cup) cream or crème fraîche
100g (¾ cup) frozen peas
Salt & black pepper, to taste
Fresh parsley, chopped, to finish
Optional: grated Parmesan
Instructions
🥣 Step 1: Cook the Butternut Squash
Boil or steam your cubed squash until fork-tender (about 10–12 minutes), then blend into a smooth purée. Set aside.
🔥 Step 2: Crisp the Chorizo
In a dry pan over medium heat, cook the sliced chorizo until it’s crispy and golden, about 3–4 minutes per side. Remove and drain on paper towel. This will be your topping.
🍳 Step 3: Build the Base
In the same pan, add olive oil. Sauté onion until soft, then stir in garlic and the diced chorizo. Cook until the chorizo releases its oils and is slightly caramelized.
🍚 Step 4: Add Orzo & Stock
Stir in the orzo to toast for 1–2 minutes. Pour in the stock and bring to a simmer. Cook for 10–12 minutes, stirring often, until orzo is al dente and most of the liquid absorbed.
🧡 Step 5: Stir in Creaminess
Lower the heat, then add your butternut squash purée and cream. Mix until everything is creamy and well combined.
🌿 Step 6: Final Touches
Add peas and cook for another 2–3 minutes. Season to taste with salt and black pepper.
🥄 Step 7: Serve
Spoon into bowls, top generously with crispy chorizo, a sprinkle of parsley, and a touch of Parmesan if you like.
Tips for Success
Chorizo Crisping: Use a nonstick or cast iron pan to get that perfect sear without burning.
Make Ahead: The butternut purée can be made up to 3 days in advance.
Cream Swap: Use coconut cream for a dairy-free alternative.
Storage & Reheating
Leftovers keep well in the fridge for 2–3 days. Reheat with a splash of stock or cream to loosen the orzo. The crispy chorizo is best added fresh, so store it separately if possible.
Pairing Ideas
Wine: Try a chilled glass of Spanish Albariño or a light red like Pinot Noir.
Side Salad: A lemony arugula salad balances the richness.
Bread: Crusty sourdough is perfect for scooping up every creamy bite.
🧡 Ready to Cozy Up?
This dish has quickly become a favorite in our kitchen—and we hope it becomes one in yours too. Whether you’re making it for a quiet night in or as a show-stopper for guests, creamy butternut orzo with crispy chorizo and peas hits all the right notes.
Let me know in the comments if you tried this recipe or gave it your own twist!
Would you like a printable version, email sign-up embed, or nutritional facts added to the post?


Mustard Mayonnaise 3 ways
1. Classic Mustard Mayonnaise (Manual Method)
Ingredients:
2 egg yolks
1 tablespoon Dijon mustard
1 tablespoon white wine vinegar or lemon juice
250 ml (1 cup) of vegetable oil (or a mix of vegetable and olive oil)
Salt and pepper to taste
Instructions:
Combine egg yolks and mustard: In a medium bowl, whisk together the egg yolks and Dijon mustard until smooth.
Add vinegar or lemon juice: Gradually whisk in the white wine vinegar or lemon juice.
Slowly add oil: Start adding the oil a few drops at a time while continuously whisking. This ensures the oil emulsifies with the egg mixture.
Increase oil addition: As the mixture begins to thicken, you can start adding the oil in a slow, steady stream while whisking constantly until all the oil is incorporated.
Season: Add salt and pepper to taste and adjust the acidity if needed by adding more vinegar or lemon juice.
2. Mustard Mayonnaise with Raw Egg (Hand Plunger Method)
Ingredients:
1 whole raw egg
1 tablespoon Dijon mustard
1 tablespoon white wine vinegar or lemon juice
250 ml (1 cup) of vegetable oil (or a mix of vegetable and olive oil)
Salt and pepper to taste
Instructions:
Combine ingredients in a jar: In a tall, narrow jar, add the whole egg, Dijon mustard, and white wine vinegar or lemon juice.
Add oil: Pour the oil on top of the other ingredients in the jar.
Plunge: Insert the hand plunger (immersion blender) into the jar, making sure it reaches the bottom.
Blend: Turn on the hand plunger and blend continuously while slowly lifting it upwards. This should take about 20-30 seconds for the mayonnaise to form.
Season: Add salt and pepper to taste and adjust the acidity if needed by adding more vinegar or lemon juice.
3. Mustard Mayonnaise with Boiled Egg (Hand Plunger Method)
Ingredients:
1 boiled egg
1 tablespoon Dijon mustard
1 tablespoon white wine vinegar or lemon juice
250 ml (1 cup) of vegetable oil (or a mix of vegetable and olive oil)
Salt and pepper to taste
Instructions:
Mash the boiled egg : In a medium bowl, mash the boiled egg with a fork until it’s smooth.
Combine with mustard: Add the Dijon mustard and white wine vinegar or lemon juice, and mix until smooth.
Add oil: Transfer the mixture to a tall, narrow jar. Pour the oil on top of the other ingredients.
Plunge: Insert the hand plunger (immersion blender) into the jar, making sure it reaches the bottom.
Blend: Turn on the hand plunger and blend continuously while slowly lifting it upwards. This should take about 20-30 seconds for the mayonnaise to form.
Season: Add salt and pepper to taste and adjust the acidity if needed by adding more vinegar or lemon juice.
Enjoy making your own mustard mayonnaise with these three methods! Whether you go for the classic manual method or the hand plunger techniques, you're sure to have a delicious and creamy condiment ready in no time.

Fermenting Hot Sauce: Carrot, Ginger & Salted Preserved Orange Magic!
Welcome, fellow flavor adventurers! If you're looking to level up your condiment game, this fermenting hot sauce recipe will blow your mind—and your taste buds. The combination of sweet carrots, zesty ginger, spicy chilies, and the mysterious depth of salted preserved oranges creates a truly unique hot sauce you'll want to put on everything.
Why Ferment?
Fermentation isn't just for pickles! Fermenting hot sauce brings out complexity, enhances flavors, and introduces probiotics that are great for gut health. Plus, it's fun to watch the magic happen over time.
Ingredients
2 cups carrots, peeled and sliced
1-2 inches fresh ginger, peeled and sliced
3-6 fresh chilies (jalapeño, habanero, or your favorite), stemmed
1/2 cup salted preserved orange (rind and pulp, chopped)
2-3 cloves garlic, smashed
2 cups filtered water
2 tablespoons non-iodized salt (such as sea salt or kosher salt)
Instructions
1. Prepare the Brine
Mix the salt with the water until completely dissolved.
2. Layer Your Flavors
In a clean glass jar, add carrots, ginger, chilies, garlic, and salted preserved orange. Pour the brine over until everything is submerged.
3. Weigh Down the Veggies
Place a fermentation weight or a small clean jar inside the larger jar to keep the veggies under the brine.
4. Let It Ferment!
Cover loosely with a lid or cloth. Keep the jar at room temperature, away from direct sunlight, for 7-14 days. Check daily for bubbles and taste after a week—you’re looking for tang and depth.
5. Blend & Bottle
Once fermented to your liking, blend everything together until smooth. Strain for a thinner sauce, if desired. Transfer to clean bottles and refrigerate.
How to Use
Drizzle on eggs, tacos, and roasted veggies
Swirl into soups, stews, or marinades
Mix into mayo or yogurt for a zesty dip
Tips for Success
Sterilize all jars and utensils before use to prevent unwanted bacteria.
If white mold (kahm yeast) appears, skim it off—it’s harmless, but best avoided.
Want it tangier? Let it ferment longer!
Adjust chili quantity for desired heat level.
Final Thoughts
Fermenting may seem intimidating, but the results are worth the wait! This carrot, ginger, and orange hot sauce is both vibrant and nourishing—a little bottle of sunshine for your fridge. Happy fermenting, and don’t forget to share your creations!


All About Kombucha: Your Guide to Brewing Fizzy Magic at Home
Kombucha, a tangy, effervescent tea, is a delightful beverage known for its potential health benefits and unique flavors. Brewing your own kombucha at home can be a fun and rewarding experience, allowing you to experiment with flavors and enjoy a refreshing, probiotic-rich drink. Let's dive into the world of kombucha and learn how to make it from scratch using the metric system.

What is Kombucha?
Kombucha is a fermented tea that has been enjoyed for centuries. It's made by fermenting sweetened tea with a SCOBY (Symbiotic Culture of Bacteria and Yeast). During fermentation, the SCOBY consumes the sugar in the tea, producing beneficial acids, enzymes, and probiotics that contribute to kombucha's unique taste and health benefits.
Benefits of Kombucha
Probiotics: Kombucha contains live cultures that can support gut health.
Antioxidants: The tea used in kombucha provides antioxidants that can help protect cells from damage.
Detoxification: The acids and enzymes in kombucha may aid in detoxifying the liver.
Energy Boost: Kombucha contains small amounts of caffeine and B vitamins, which can provide a natural energy boost.
How to Make Kombucha at Home
Ingredients:
2 liters of water
4-6 bags of black or green tea (or 2-3 tablespoons of loose-leaf tea)
200 grams of granulated sugar
1 large SCOBY
240 ml of starter tea (previously brewed kombucha or store-bought, unflavored kombucha)
Glass jar (to fit liquid)
Cloth cover or paper towel and rubber band
Step-by-Step Instructions:
Boil Water and Steep Tea: Bring 2 liters of water to a boil. Remove from heat and add the tea bags or loose-leaf tea. Let it steep for about 10 minutes.
Add Sugar: Remove the tea bags or strain the loose tea leaves. Stir in the 200 grams of sugar until it dissolves completely.
Cool the Tea: Allow the sweetened tea to cool to room temperature. This step is crucial to avoid harming the SCOBY with hot tea.
Combine with Starter Tea: Pour the cooled tea into a clean glass jar. Add the 240 ml of starter tea.
Add the SCOBY: Carefully add the SCOBY to the jar.
Cover and Ferment: Cover the jar with a cloth or paper towel and secure it with a rubber band. Let it ferment at room temperature for 7-10 days, tasting periodically until it reaches your desired level of tanginess.
Bottle and Flavor (Optional): Remove the SCOBY and 240 ml of kombucha to use as starter tea for the next batch. Transfer the kombucha to bottles, and if desired, add flavors like fruit, ginger, or herbs.
Second Fermentation (Optional): Leave the bottles at room temperature for 1-3 days to develop carbonation, then refrigerate.
Tips and Tricks for Brewing Kombucha:
Temperature Control: Keep the kombucha at a consistent room temperature (20-24°C) for optimal fermentation.
Cleanliness: Ensure all equipment and hands are clean to prevent contamination.
Experiment with Flavors: Once you've mastered the basic kombucha, try adding different fruits, herbs, or spices during the second fermentation for unique flavors.
Storage: Store your finished kombucha in the refrigerator to slow fermentation and maintain its flavor.
Brewing kombucha at home can be a fun, creative process that results in a delicious and healthful beverage. Whether you enjoy it plain or flavored, kombucha is a great way to incorporate probiotics and antioxidants into your diet.
Cheers to your health! 🍹

Crispy Homemade Falafel: A Middle Eastern Classic
If you’re looking for a dish that’s bursting with flavor, easy to make, and completely plant-based, falafel is your answer! These golden, crispy chickpea fritters are a staple of Middle Eastern cuisine and make a perfect meal or snack-whether tucked into warm pita bread, served over a salad, or enjoyed on their own with a creamy tahini sauce.
Today, I’m sharing my favorite homemade falafel recipe. Trust me, once you try making falafel from scratch, you’ll never go back to store-bought!
What is Falafel?

Falafel is a beloved street food made primarily from chickpeas (or sometimes fava beans), blended with fresh herbs and spices, then shaped into balls or patties and fried until crispy. It’s naturally vegan, high in protein, and packed with flavor.
Ingredients
• 1 cup dried chickpeas (not canned)
• ½ large onion, roughly chopped (about 1 cup)
• 2 tablespoons finely chopped fresh parsley
• 2 tablespoons finely chopped fresh cilantro
• 1 teaspoon salt
• ½–1 teaspoon ground black pepper
• 4 cloves garlic
• 1 teaspoon cumin
• 1 teaspoon ground coriander
• ¼ teaspoon cayenne pepper (optional)
• ½ teaspoon baking powder
• 4–6 tablespoons flour (as needed)
• Vegetable oil, for frying
Instructions
1. Soak the Chickpeas
• Place dried chickpeas in a large bowl and cover with plenty of cold water. Soak overnight (at least 12 hours). They’ll double in size!
• Drain and rinse well.
2. Make the Falafel Mixture
• Add soaked chickpeas, onion, parsley, cilantro, salt, pepper, garlic, cumin, coriander, and cayenne to a food processor.
• Pulse until the mixture is finely ground but not pureed-think coarse sand. Scrape down the sides as needed.
• Sprinkle in baking powder and 4 tablespoons of flour. Pulse to combine. The mixture should hold together when pressed. If not, add more flour as needed.
3. Shape the Falafel
• With wet hands, form the mixture into balls or patties (about the size of a golf ball).
4. Fry the Falafel
• Heat 2 inches of oil in a deep pan to 350°F (175°C).
• Fry falafel in batches, turning as needed, until deep golden brown and crisp (about 3–4 minutes per batch).
• Drain on paper towels.
Serving Suggestions
• Classic: Stuff falafel into warm pita with lettuce, tomato, cucumber, and a drizzle of tahini sauce.
• Salad: Serve over greens with pickled veggies and a lemony dressing.
• Snack: Enjoy with hummus or your favorite dip.
Tips for Perfect Falafel
• Don’t use canned chickpeas! They’re too soft and will make your falafel mushy.
• Chill the mixture: If you have time, chill the mixture for 30 minutes before shaping. This helps them hold together.
• Baking option: For a lighter version, brush falafel with oil and bake at 400°F (200°C) for 20–25 minutes, flipping halfway through.
Final Thoughts
Homemade falafel is easier than you think and so rewarding. Crispy on the outside, fluffy and herby inside-it’s comfort food at its best! Give this recipe a try and let me know how it turns out in the comments below.
Happy cooking!
Did you enjoy this recipe?
Subscribe for more delicious, plant-based recipes and kitchen tips!

Discover the Delight of French Buckwheat Galettes
If you're a fan of simple, wholesome, and delicious food, French buckwheat galettes are a must-try. Originating from Brittany, these savory crepes are not only gluten-free but also incredibly versatile. Whether you're a seasoned cook or a beginner, this recipe will guide you through making perfect galettes every time.
What Are Buckwheat Galettes?
Buckwheat galettes, also known as "galettes de sarrasin," are savory crepes made from buckwheat flour. Unlike their sweet crepe counterparts, galettes are typically filled with savory ingredients like ham, cheese, eggs, and vegetables. They have a distinctive nutty flavor and a slightly crisp texture.
Ingredients
Your basic recipe of buckwheat, water, and salt is a great start! Here's a more detailed version to enhance the flavor and texture:
300 grams buckwheat flour
600 grams water
1/4 cup milk (optional for a softer texture)
1 large egg (optional, I never add it)
9 grams salt
Butter or oil for cooking
Instructions
Prepare the Batter: In a large bowl, whisk together the buckwheat flour and salt. Gradually add half of the water and all the milk (if using), whisking until smooth. If using, add the egg and beat the batter until it is well combined and holes are showing on top of the paton.
Rest the batter (paton) for 12-36 hours depending of your likening.
Add the rest of the water just before cookimng and mix well.
Cook the Galettes: Heat a non-stick skillet or crepe pan over medium heat and lightly grease with butter or oil. Pour a small amount of batter into the pan, swirling to spread it thinly and evenly. Cook for 1-2 minutes until the edges start to lift and the bottom is golden brown. Flip and cook for another minute.
Add Fillings: Once flipped, you can add your favorite savory fillings. Classic options include ham, grated cheese, and a cracked egg. Fold the edges over the filling and cook until the cheese is melted and the egg is set.
Serve: Serve the galettes hot, straight from the pan. They pair wonderfully with a simple green salad and a glass of cider.
Tips for Perfect Galettes
Resting the Batter: Allowing the batter to rest helps improve the texture of the galettes.
Consistency: Adjust the consistency of the batter with water if it's too thick. It should be pourable but not too runny.
Cooking Temperature: Medium heat works best to ensure the galettes cook evenly without burning.
Variations
Vegetarian: Fill with sautéed mushrooms, spinach, and goat cheese.
Seafood: Try smoked salmon, crème fraîche, and dill.
Sweet: For a twist, you can make sweet galettes by adding a touch of sugar to the batter and filling with fruits and honey.
Enjoy experimenting with different fillings and find your favorite combination. Bon appétit! 🍽️

Yeast Water 101: The Effervescent Secret to Flavorful, Wild Fermentation Baking (Grapes + Water Method)
Yeast water is a fantastic and extremely cheap natural leavening agent that you can easily make at home using grapes. This method captures wild yeast from the fruit, creating a bubbly, active liquid that can be used in various baking recipes. Let's dive into the process of making yeast water, its uses, and the science behind it.
How to Make Yeast Water with Grapes
Ingredients:
Fresh, organic grapes (about a handful)
Filtered water
A clean glass jar with a lid
Instructions:
Prepare the Grapes: Rinse the grapes thoroughly to remove any dirt. Organic grapes are preferred as they are free from pesticides that might inhibit yeast growth.
Fill the Jar: Place the grapes in the glass jar and fill it with filtered water, leaving some space at the top.
Seal and Shake: Seal the jar with the lid and shake it gently to mix the contents.
Fermentation: Leave the jar in a warm, dark place for 3-5 days. Shake the jar once or twice a day to help release the natural yeast from the grape skins.
Check for Fermentation: After a few days, you should see bubbles forming, and the water will become slightly cloudy. This indicates that fermentation is occurring.
Strain and Store: Once the yeast water is ready, strain out the grapes and transfer the liquid to a clean bottle. Store it in the refrigerator until you're ready to use it.
Uses of Yeast Water
Yeast water can be used as a natural leavening agent in various baking recipes. Here are some common uses:
Bread Baking: Substitute yeast water for commercial yeast in bread recipes to create naturally leavened bread with a unique flavor profile.
Pizza Dough: Use yeast water to make pizza dough for a light, airy crust.
Pancakes and Waffles: Add yeast water to your pancake or waffle batter for extra fluffiness and a mild, fruity taste.
Sourdough starter: Get a fast starter by mixing 50% flour and yeast water
The Science Behind Yeast Water
Yeast water works by harnessing the power of wild yeast, which is naturally present on the skins of grapes. Here's a bit of the science behind it:
Fermentation Process: Yeast are single-celled organisms that feed on sugars present in the grapes. During fermentation, yeast converts these sugars into carbon dioxide and alcohol. The carbon dioxide creates bubbles, which help dough rise
Wild Yeast vs. Commercial Yeast: Wild yeast, like the kind found on grapes, is the same species as commercial baker's yeast (Saccharomyces cerevisiae) but can have different strains. This can result in unique flavors and characteristics in your baked goods
Health Benefits: Using natural yeast water can be beneficial for gut health as it promotes the growth of beneficial bacteria and reduces the need for commercial additives
By making your own yeast water, you not only create a versatile baking ingredient but also engage in a fascinating natural fermentation process. Give it a try and enjoy the unique flavors it brings to your homemade baked goods!
Feel free to ask if you have any questions or need further details on any part of the process!

Brewing a Classic Red Ale
Red ales are known for their rich malt character, balanced by a slight bitterness, and their beautiful reddish hue. If you're a fan of beer and enjoy experimenting in the kitchen, brewing your own red ale can be a fulfilling and enjoyable hobby. Ready to embark on a brewing adventure? Let’s get started with a classic red ale recipe!
What is a Red Ale?
Red ale, also known as Irish red ale, is a style of beer that originated in Ireland. It’s characterized by its reddish-brown color, smooth malt flavors, and a hint of caramel. The use of roasted barley and specialty malts gives it its distinctive color and taste. Red ales are typically medium-bodied with a balanced bitterness, making them a popular choice for many beer enthusiasts.
The Brewing Process
Homebrewing involves several steps, from mashing the grains to fermenting the beer. Here’s a step-by-step guide to brewing a classic red ale.
Classic Red Ale Recipe
Ingredients:
3.5 kg of pale malt
0.5 kg of caramel malt (40L)
0.25 kg of roasted barley
15 grams of East Kent Goldings hops (bittering)
15 grams of East Kent Goldings hops (flavor)
1 packet of ale yeast (such as Wyeast 1084 Irish Ale)
Priming sugar (for bottling)
Water
Step-by-Step Instructions:
Step 1: Mashing
Heat water: Heat 12 liters of water to approximately 68°C in your mash tun (a large insulated container).
Add grains: Add the pale malt, caramel malt, and roasted barley to the mash tun, stirring to avoid clumps.
Mash: Maintain the temperature at 65-68°C for 60 minutes, allowing the enzymes in the malt to convert the starches into fermentable sugars.
Step 2: Lautering and Sparging
Lauter: After the mash, drain the liquid (wort) from the grains into your brew kettle.
Sparge: Rinse the grains with 8 liters of water at 75-77°C to extract any remaining sugars, adding this to the brew kettle.
Step 3: Boiling
Boil the wort: Bring the wort to a boil. Once boiling, add the bittering hops and boil for 60 minutes.
Add flavor hops: With 10 minutes remaining in the boil, add the flavor hops.
Cool the wort: After the boil, cool the wort quickly using a wort chiller or an ice bath.
Step 4: Fermentation
Transfer to fermenter: Pour the cooled wort into a sanitized fermenter.
Pitch the yeast: Add the ale yeast to the wort and seal the fermenter with an airlock.
Ferment: Allow the wort to ferment at 18-20°C for 1-2 weeks, until fermentation is complete.
Step 5: Bottling
Prepare priming solution: Dissolve the priming sugar in a small amount of boiling water and cool it.
Bottle the beer: Transfer the beer to a bottling bucket, add the priming solution, and bottle the beer using sanitized bottles and caps.
Condition: Store the bottles at room temperature for 1-2 weeks to carbonate, then refrigerate.
Tips for Successful Homebrewing
Sanitation: Ensure all equipment is thoroughly sanitized to prevent contamination.
Temperature Control: Maintain consistent temperatures during mashing and fermentation for optimal results.
Patience: Allow the beer to ferment and condition fully for the best flavor.
Brewing your own red ale at home can be a gratifying experience. With its rich malt character, balanced bitterness, and beautiful color, this classic red ale is sure to impress.
Happy brewing! 🍺
Got questions or need more tips? Feel free to ask!

Crafting Homemade Candles: A Step-by-Step Guide for Beginners
There's something incredibly satisfying about making your own candles. Whether you're looking to add a personal touch to your home decor, create thoughtful gifts for friends and family, or simply enjoy a relaxing and creative activity, candle-making is a fantastic hobby. Ready to get started? Let's dive into the world of homemade candles!
Why Make Your Own Candles?
Customization: You can choose your own scents, colors, and shapes to create candles that perfectly match your style and preferences.
Eco-Friendly: Making your own candles allows you to use natural and sustainable ingredients, reducing your environmental footprint.
Cost-Effective: Homemade candles can be more affordable than store-bought ones, especially if you make them in bulk.
Materials Needed:
Wax (soy wax, beeswax, or paraffin wax)
Wicks
Essential oils (for fragrance)
Candle dye (optional, for color)
Containers (glass jars, tins, etc.)
Double boiler or a heatproof bowl and pot
Thermometer
Stirring utensil
Wick holders (pencils or chopsticks work well)
Glue dots or hot glue (to secure the wick)
Instructions:
Prepare Your Containers:
Clean your containers thoroughly and dry them completely.
Attach the wick to the bottom center of each container using a glue dot or a dab of hot glue. Use a wick holder to keep the wick centered and upright.
Melt the Wax:
Measure the amount of wax needed for your containers. A good rule of thumb is to fill your container with wax flakes twice to get the right amount.
Set up a double boiler by placing a heatproof bowl over a pot of simmering water. Add the wax to the bowl and stir occasionally until it’s completely melted.
Use a thermometer to monitor the temperature. For most waxes, the ideal melting temperature is between 160-180°F (70-82°C).
Add Fragrance and Color:
Once the wax is melted, remove it from heat. If you’re adding color, stir in the candle dye until it’s fully dissolved.
Add essential oils for fragrance. A good starting point is 1 ounce of fragrance oil per pound of wax, but you can adjust based on your preference. Stir well to ensure the fragrance is evenly distributed.
Pour the Wax:
Allow the wax to cool slightly before pouring it into your containers. The ideal pouring temperature is usually around 130-140°F (54-60°C).
Carefully pour the wax into the prepared containers, leaving a small amount of space at the top. Make sure the wick stays centered.
Let the Candles Set:
Allow the candles to cool and harden completely. This can take several hours or overnight.
Once the candles are set, trim the wick to about 1/4 inch (6 mm) above the wax surface.
Cure the Candles:
For the best scent throw, let your candles cure for at least 24-48 hours before burning them. This allows the fragrance to fully bind with the wax.
Enjoy Your Handmade Candles!
Now you have your very own handmade candles ready to light up your space. Enjoy the warm glow and delightful scents that you’ve created.
Have you tried making candles before, or is this your first time?

Easy Homemade Kimchi: A Beginner's Guide
Kimchi is a traditional Korean dish made from fermented vegetables, most commonly napa cabbage and daikon radish. It's packed with flavor, probiotics, and nutrients, making it a fantastic addition to your meals. Plus, making kimchi at home is easier than you might think. Ready to get started? Let's dive into this step-by-step guide for easy homemade kimchi!
What is Kimchi?
Kimchi is a staple in Korean cuisine, known for its tangy, spicy, and umami flavors. The fermentation process not only enhances its taste but also increases its nutritional value by adding beneficial probiotics. Kimchi can be enjoyed on its own, as a side dish, or incorporated into various recipes like stews, fried rice, and pancakes.
Health Benefits
Probiotics: Kimchi is rich in probiotics, which support gut health and digestion.
Nutrient-Dense: It's packed with vitamins A, B, and C, as well as minerals like calcium and iron.
Low Calorie: Kimchi is a low-calorie food, making it a healthy addition to any diet.
How to Make Easy Homemade Kimchi
Ingredients:
1 large napa cabbage
1/4 cup (60 ml) of sea salt
4 cups (960 ml) of water
1 daikon radish, julienned
3 green onions, chopped
1 tablespoon (15 ml) of grated ginger
4 cloves of garlic, minced
2 tablespoons (30 ml) of fish sauce (optional, for extra umami)
2 tablespoons (30 ml) of Korean red pepper flakes (gochugaru)
1 tablespoon (15 ml) of sugar
Step-by-Step Instructions
Step 1: Prepare the Cabbage
Cut the cabbage: Quarter the napa cabbage lengthwise, then cut into bite-sized pieces.
Salt the cabbage: In a large bowl, dissolve 1/4 cup (60 ml) of sea salt in 4 cups (960 ml) of water. Add the cabbage and toss to coat. Let it sit for 1-2 hours, tossing occasionally.
Step 2: Rinse and Drain
Rinse the cabbage: After salting, rinse the cabbage thoroughly under cold water to remove excess salt. Drain well.
Step 3: Make the Kimchi Paste
Combine ingredients: In a separate bowl, mix the grated ginger, minced garlic, fish sauce (if using), Korean red pepper flakes (gochugaru), and sugar to form a paste.
Step 4: Mix the Vegetables
Add vegetables to the paste: Add the julienned daikon radish and chopped green onions to the kimchi paste. Mix well to coat the vegetables evenly.
Step 5: Combine and Pack
Mix the cabbage and paste: Add the rinsed and drained cabbage to the bowl with the kimchi paste and vegetables. Use your hands to mix everything together, ensuring the cabbage is well coated with the paste.
Pack into jars: Pack the kimchi tightly into clean glass jars, pressing down to remove air pockets. Leave some space at the top for expansion.
Step 6: Ferment
Ferment at room temperature: Cover the jars with lids and leave them at room temperature for 1-2 days to start the fermentation process.
Taste and refrigerate: After 1-2 days, taste the kimchi. If it’s fermented to your liking, transfer the jars to the refrigerator to slow down the fermentation. If you prefer a stronger flavor, let it ferment for a few more days at room temperature before refrigerating.
Tips and Variations
Adjust the Spice Level: You can adjust the amount of Korean red pepper flakes to make your kimchi spicier or milder.
Add Vegetables: Experiment with adding other vegetables like carrots, chives, or bok choy.
Use a Weight: Place a clean, food-safe weight on top of the kimchi to keep it submerged in its juices during fermentation.
Making kimchi at home is a fun and rewarding process that allows you to enjoy this traditional Korean dish with your own personal touch. Whether you enjoy it as a side dish, in soups, or mixed into your favorite recipes, homemade kimchi is sure to add a burst of flavor and nutrition to your meals.
Happy fermenting! 🥬
Got questions or need more tips? Feel free to ask!

Fermented Hot Sauce
Introducing our Fermented Hot Sauce: a unique blend of heat and flavor that enhances your cooking. Crafted from fresh peppers, garlic, and spices, our fermentation process amplifies taste and promotes gut health. Ideal for tacos, soups, and marinades, this versatile sauce complements both savory and sweet dishes. Experience the benefits of fermentation with our health-conscious hot sauce—spice up your life today!
Fermented hot sauce is a fantastic way to add a burst of flavor to your dishes. The fermentation process not only enhances the taste but also adds beneficial probiotics. Here's a simple recipe with some variations and cost-saving tips, including your unique additions of preserved lemon and kombucha vinegar.
Ingredients:
500 grams of fresh chili peppers (mix of your choice)
1 medium onion (about 150 grams), chopped
4 cloves of garlic, minced
1 preserved lemon, chopped
50 ml kombucha vinegar
1 tablespoon sea salt (about 15 grams)
500 ml water (non-chlorinated)
Instructions:
Prepare the Peppers: Remove the stems from the chili peppers. You can keep the seeds for extra heat or remove them for a milder sauce.
Blend Ingredients: In a blender, combine the chili peppers, onion, garlic, preserved lemon, and kombucha vinegar. Blend until you have a smooth mixture.
Fermentation Brine: Dissolve the sea salt in the water to create a brine.
Combine and Ferment: Pour the blended mixture into a clean glass jar. Add the brine until the mixture is fully submerged. Leave some space at the top of the jar for gases to escape.
Fermentation Process: Cover the jar with a cloth or a fermentation lid. Let it sit at room temperature (18-22°C) for 5-7 days. Check daily to ensure the mixture is submerged and to release any built-up gases.
Final Blend: After fermentation, blend the mixture again until smooth. Strain if desired for a thinner consistency.
Bottle and Store: Transfer the hot sauce to a clean bottle. Store in the refrigerator for up to 6 months.
Variations:
Fruit-Infused: Add 100 grams of mango or pineapple for a fruity twist.
Smoky Flavor: Use smoked chili peppers or add 1 teaspoon of smoked paprika.
Herbal Notes: Add fresh herbs like cilantro or basil during the blending process.
Cost-Saving Tips:
Seasonal Peppers: Buy chili peppers when they are in season to save money.
DIY Preserved Lemons: Make your own preserved lemons at home using salt and lemons.
Reuse Kombucha Vinegar: If you brew kombucha at home, use the vinegar from your batch instead of buying it.
Enjoy your homemade fermented hot sauce! Feel free to experiment with different ingredients and flavors to make it your own. 🌶️

Welcome to Mr. Forkonomics: Your Guide to Homemade Savings
Welcome to Mr. Forkonomics, your ultimate destination for delicious recipes and practical tips to save money by doing everything homemade. Whether you're a seasoned home cook or just starting out, our goal is to help you create mouth-watering dishes while keeping your budget in check.
Why Mr. Forkonomics?
In today's fast-paced world, it's easy to rely on convenience foods and dining out. However, these habits can quickly add up and strain your finances. At Mr. Forkonomics, we believe that with a little creativity and effort, you can enjoy high-quality, homemade meals without breaking the bank. Our mission is to empower you with the knowledge and skills to make the most of your kitchen and wallet.
What You'll Find Here
Budget-Friendly Recipes: Discover a wide range of recipes that are not only delicious but also cost-effective. From hearty breakfasts to satisfying dinners and everything in between, we've got you covered.
Money-Saving Tips: Learn how to stretch your grocery budget further with our practical tips and tricks. We'll show you how to make the most of seasonal produce, buy in bulk, and reduce food waste.
DIY Projects: Explore fun and easy DIY projects that can help you save money around the house. From homemade cleaning products to DIY gifts, you'll find plenty of inspiration to get creative.
Meal Planning Guides: Simplify your meal planning process with our helpful guides. We'll provide you with meal plans, shopping lists, and prep tips to make your weeknight dinners a breeze.
Join the Mr. Forkonomics Community
We believe that cooking and saving money should be enjoyable and rewarding. That's why we encourage you to join our community of like-minded individuals who are passionate about homemade living. Share your own tips, ask questions, and connect with others who are on the same journey.
Get Started Today
Ready to take control of your kitchen and your budget? Dive into our collection of recipes and tips, and start your homemade savings journey today. Remember, every small step you take towards cooking at home and saving money adds up to big rewards in the long run.
Thank you for visiting Mr. Forkonomics. We can't wait to see what you'll create!

How to Make Perfect Ciabatta Bread at Home
Ciabatta, with its crispy crust and airy crumb, is a favorite among bread lovers. This Italian classic is surprisingly easy to make at home with the right technique and a bit of patience. Follow this metric recipe to bake your own delicious ciabatta!
Ingredients
500 grams of bread flour
10 grams of salt
10 grams of instant yeast
400 milliliters of water
30 milliliters of olive oil
Instructions
Prepare the Dough:
In a large mixing bowl, combine the bread flour, salt, and instant yeast.
Gradually add the water and olive oil, mixing until a sticky dough forms.
Knead the Dough:
Transfer the dough to a lightly floured surface.
Knead the dough for about 10 minutes until it becomes smooth and elastic. You can use a stand mixer with a dough hook if you prefer.
First Rise:
Place the dough in a lightly oiled bowl, cover it with a damp cloth, and let it rise in a warm place for about 1-2 hours, or until it has doubled in size.
Shape the Dough:
Gently deflate the dough and transfer it to a floured surface.
Divide the dough into two equal pieces and shape each piece into a rough rectangle. Be careful not to overwork the dough to maintain its airy texture.
Second Rise:
Place the shaped dough on a baking sheet lined with parchment paper.
Cover with a damp cloth and let it rise for another 30-45 minutes.
Bake the Bread:
Preheat your oven to 220°C (428°F).
Bake the ciabatta for 20-25 minutes, or until the crust is golden brown and the bread sounds hollow when tapped on the bottom.
Cool and Enjoy:
Let the ciabatta cool on a wire rack before slicing.
Enjoy your homemade ciabatta with olive oil, balsamic vinegar, or your favorite toppings!
Tips for Success
Hydration: Ciabatta dough is very wet and sticky. Don't be tempted to add more flour; this high hydration is key to achieving the bread's characteristic open crumb.
Handling: Handle the dough gently to preserve the air bubbles formed during fermentation.
Steam: For an extra crispy crust, place a pan of water in the oven while baking to create steam.
I hope you enjoy baking and eating your homemade ciabatta! If you have any questions or need further tips, feel free to ask. Happy baking! 🍞

Homemade Protein Bars: A Nutritious and Delicious Snack
Protein bars are a convenient and healthy snack option, especially for those with busy lifestyles. Making your own protein bars at home allows you to control the ingredients, avoid unnecessary additives, and customize the flavors to your liking. Ready to whip up some tasty protein bars? Let’s get started!
Why Make Your Own Protein Bars?
Customizable: Tailor the ingredients to suit your dietary needs and flavor preferences.
Healthy: Avoid artificial additives and preservatives found in store-bought bars.
Cost-Effective: Homemade protein bars can be more affordable, especially when made in bulk.
What You’ll Need
Ingredients:
1 cup (240 ml) of protein powder (your choice of flavor)
1/2 cup (120 ml) of oats (rolled or quick oats)
1/4 cup (60 ml) of nut butter (peanut, almond, or cashew)
1/4 cup (60 ml) of honey or maple syrup
1/4 cup (60 ml) of milk or milk alternative (almond, soy, etc.)
1 teaspoon of vanilla extract
Optional mix-ins: chocolate chips, dried fruit, nuts, seeds, coconut flakes, etc.
Equipment:
Mixing bowl
Spatula or wooden spoon
Baking dish or pan (8x8 inch or similar size)
Parchment paper
Refrigerator
Step-by-Step Instructions
Step 1: Prepare Your Ingredients
Measure and gather ingredients: Ensure you have all your ingredients ready to go.
Step 2: Mix the Dry Ingredients
Combine dry ingredients: In a mixing bowl, combine the protein powder and oats. Mix until well combined.
Step 3: Add the Wet Ingredients
Add nut butter and honey: Add the nut butter and honey (or maple syrup) to the dry mixture.
Mix well: Use a spatula or wooden spoon to thoroughly combine the ingredients.
Step 4: Add Milk and Vanilla Extract
Pour in milk: Gradually add the milk or milk alternative to the mixture, stirring until it reaches a dough-like consistency.
Add vanilla extract: Stir in the vanilla extract.
Step 5: Incorporate Mix-Ins (Optional)
Add mix-ins: If using, fold in your chosen mix-ins, such as chocolate chips, dried fruit, or nuts.
Step 6: Press into a Pan
Line the pan: Line a baking dish or pan with parchment paper, leaving some overhang for easy removal.
Press the mixture: Transfer the mixture to the pan and use a spatula to press it down evenly and firmly.
Step 7: Chill and Set
Refrigerate: Place the pan in the refrigerator and let it chill for at least 1-2 hours, or until the bars are firm.
Cut into bars: Once set, use the parchment paper to lift the mixture out of the pan and cut it into bars of your desired size.
Step 8: Store and Enjoy
Store in an airtight container: Keep the bars in the refrigerator for up to a week or in the freezer for longer storage.
Enjoy your homemade protein bars: Grab a bar whenever you need a quick, nutritious snack!
Tips and Variations
Experiment with Flavors: Try different protein powder flavors and mix-ins to create unique combinations.
Adjust Sweetness: If you prefer less sweetness, reduce the amount of honey or maple syrup.
Vegan Option: Use a plant-based protein powder and a milk alternative for vegan-friendly bars.
Homemade protein bars are a fantastic way to enjoy a nutritious and delicious snack that’s tailored to your taste. Whether you need a pre-workout boost, a post-workout recovery, or a healthy on-the-go snack, these bars have got you covered.
Happy snacking! 🍫
Got questions or need more tips? Feel free to ask!